Texture Quality and Anisotropic Filtering Explained
How texture resolution, mipmaps and bilinear, trilinear and anisotropic filtering work, why textures pop in, and why texture settings are mostly about memory.
Textures are the images wrapped onto every surface in a game: the grain of a wooden floor, the stitching on a jacket, the cracks in a road. Two settings control most of how they look. Texture quality decides how detailed those images are, and texture filtering, usually ending in anisotropic filtering, decides how cleanly they are sampled when you see them at a distance or at an angle. They sound similar but solve different problems and have very different costs. This guide explains both, along with mipmaps, streaming and compression, the pieces that tie them together.
Texture Resolution: What “Texture Quality” Usually Means
A texture is a grid of texels, the texture equivalent of pixels. A 4096 by 4096 texture holds four times as many texels as a 2048 by 2048 one, because doubling the width also doubles the height. More texels mean more fine detail when you get close to a surface.
In most games, the texture quality setting chooses which resolution of each texture is loaded. Lower settings typically skip the largest versions and start one or two levels down, so every texture is roughly half or a quarter of its full width. Up close, surfaces get blurrier and fine details such as text on signs or fabric patterns soften.
A modern game is built from many textures per material. A single surface often combines a base color map, a normal map for small bumps, a roughness or gloss map, a metallic map and sometimes ambient occlusion, height or emissive maps. Raising texture resolution multiplies the memory used by all of them.
Why Texture Settings Are Mostly About Memory
Here is the key fact about texture quality: sampling a high-resolution texture costs the GPU very little more time than sampling a low-resolution one. The bigger cost is storage. Textures have to sit in video memory to be used quickly, and higher-resolution textures take more of it.
That leads to a simple rule. As long as everything fits within the available memory budget, higher texture quality usually has a small effect on frame rate. Once the game asks for more than fits, the system has to shuffle data in and out, and the result is often stutter, delayed texture loading or blurry surfaces that never sharpen. That is why many games show a memory usage estimate next to the texture setting. The right texture level is mostly a question of whether it fits, not how fast it renders, which is why it behaves differently from settings like shadows or ray tracing.
Mipmaps: Pre-Shrunk Textures
When a textured surface is far away, many texels land inside a single screen pixel. If the renderer sampled just one of them, the result would flicker and shimmer as the camera moves, because each frame might pick a different texel. Fine patterns like brick or grating would break into noisy moiré patterns. This is texture aliasing.
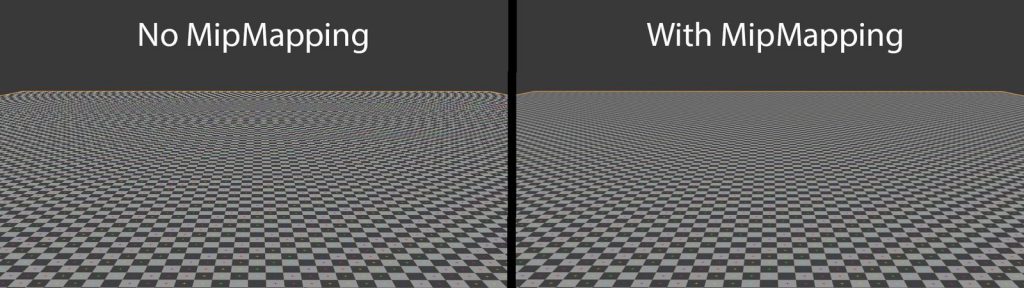
The standard solution is mipmapping, introduced by Lance Williams in his 1983 SIGGRAPH paper “Pyramidal Parametrics.” The “mip” comes from the Latin phrase multum in parvo, “much in a small space.” A mipmap chain stores the texture at full size plus a series of pre-filtered smaller copies, each half the width and height of the one before, down to a single texel. A complete chain adds about one third to the memory of the full-size texture.
When rendering, the GPU estimates how many texels fall into each pixel and picks the mip level whose texel size best matches. Distant surfaces read from small, pre-blurred mips, which removes shimmer and is also faster because smaller textures are friendlier to the GPU’s caches.
Bilinear, Trilinear and Anisotropic Filtering
Mipmaps choose the right size of texture. Filtering decides how to blend texels together when sampling. The common methods build on one another:
Bilinear filtering
Bilinear filtering takes the four nearest texels in one mip level and blends them by distance. This avoids blocky texels when you are close to a surface. Its weakness appears between mip levels: on a long floor you may see visible lines where the renderer switches from one mip to the next, because adjacent areas use different levels.
Trilinear filtering
Trilinear filtering performs a bilinear sample in the two nearest mip levels and blends between them. The visible bands between mip levels disappear, giving a smooth transition with distance.
Anisotropic filtering
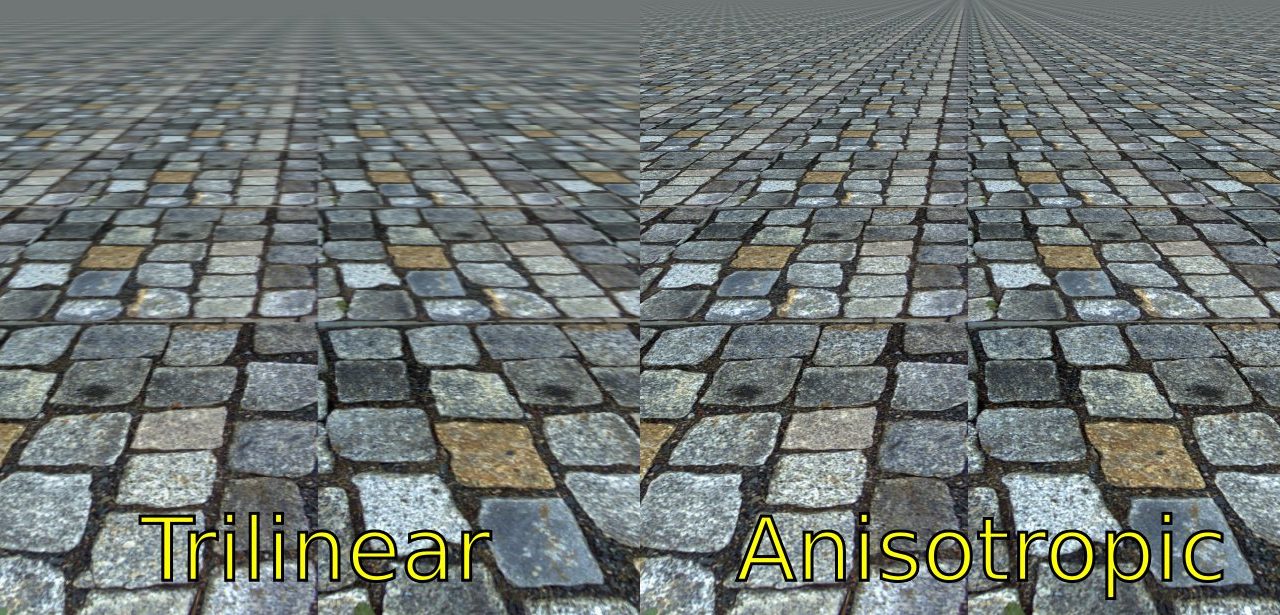
Bilinear and trilinear filtering share a hidden assumption: that each pixel covers a square-ish area of the texture. That is true when you look straight at a surface, but not when you look along it. A road stretching toward the horizon is viewed at a grazing angle. Each screen pixel covers a long, thin strip of the road texture, stretched far more in one direction than the other. “Anisotropic” simply means “not the same in all directions.”
Plain trilinear filtering handles that stretched footprint by choosing a mip level small enough for the longest direction, which over-blurs the shorter direction. Roads, floors and walls at an angle turn into a smeary mess just a short distance from the camera. Anisotropic filtering instead takes multiple samples along the long axis of the footprint, keeping detail sharp in both directions.
The setting is usually expressed as 2x, 4x, 8x or 16x, the maximum number of samples the GPU may take along that axis. Higher values keep oblique surfaces sharp farther into the distance. Because modern GPUs have dedicated texture hardware built for this and only use extra samples where surfaces are actually at an angle, high anisotropic filtering typically has a small performance cost in modern games. It is often one of the best value settings in a menu, though the exact cost depends on the game and hardware.
| Filter | What it does | Typical weakness |
|---|---|---|
| Bilinear | Blends 4 texels in one mip level | Visible bands between mip levels |
| Trilinear | Blends two mip levels | Blurry surfaces at grazing angles |
| Anisotropic (2x–16x) | Extra samples along the stretched axis | Slight cost; very little visual downside |
Texture Streaming and Pop-In
Large modern games cannot hold every texture at full resolution in memory at once. Instead, they use texture streaming. The engine keeps low-resolution mips of most textures resident and loads higher-resolution mips from storage as you approach surfaces that need them, evicting detail you no longer need.
When streaming keeps up, you never notice it. When it falls behind, you see texture pop-in: a surface appears blurry for a moment and then snaps sharp. Common causes include:
- Fast movement or camera cuts, which suddenly require many new textures at once.
- A streaming pool that is too small for the chosen texture setting, so the engine keeps lowering detail to stay within budget.
- Slow storage or busy CPU threads, delaying the loading and decompression of new data.
Some games expose a separate texture streaming budget or pool size setting. Raising it lets the engine keep more high-resolution data resident, reducing pop-in at the cost of memory. Texture pop-in looks similar to geometry pop-in from level-of-detail systems but is a separate mechanism.
Texture Compression: The BC Formats
Textures in games are almost never stored as raw pixel data in video memory. They use block compression, formats the GPU can decode on the fly while sampling. On PC these are the BC formats, documented by Microsoft for Direct3D. They all work on 4 by 4 blocks of texels, storing each block in a fixed number of bytes so the GPU can jump straight to any block without decompressing the whole image.
| Format | Bytes per 4×4 block | Typical use |
|---|---|---|
| BC1 | 8 | Color with no alpha or 1-bit alpha |
| BC3 | 16 | Color with smooth alpha |
| BC4 | 8 | Single-channel data such as masks or roughness |
| BC5 | 16 | Two-channel data, commonly normal maps |
| BC6H | 16 | High dynamic range color (added in Direct3D 11) |
| BC7 | 16 | High-quality color, optional alpha (added in Direct3D 11) |
To put that in perspective: an uncompressed 4 by 4 block of 8-bit RGBA color takes 64 bytes. BC1 stores it in 8 bytes and BC7 in 16. That four to eight times saving is why games can include as much texture detail as they do. The compression is lossy, so artists choose formats per texture type. BC1 is compact but can show blocky color artifacts; BC7 preserves more detail in the same space as BC3. Lower texture quality settings do not usually change the compression format; they mostly load smaller mip levels.
Practical Tips and Common Mistakes
- Treat texture quality as a memory setting. If a game shows a memory estimate, stay within it. Going over is a common cause of stutter and blurry textures that never resolve. See our graphics settings overview for how this compares to other options.
- Turn anisotropic filtering up. It sharpens floors and roads at an angle and usually costs little.
- Don’t confuse texture blur with render resolution blur. A soft overall image is often from a low render resolution or upscaler setting rather than textures. Our render resolution guide explains the difference.
- Judge texture quality up close. Differences between high and ultra texture settings are often visible only on nearby surfaces, so a distant landscape may look identical across settings.
- Remember resolution interacts. At lower output resolutions, the highest texture tier may add little visible detail, because there are not enough screen pixels to show it.
Textures are the most memory-hungry part of a game’s visuals, but the systems around them, mipmaps, filtering, streaming and compression, exist so that detail can be shown cheaply and without shimmer. Once you separate “how much detail is loaded” from “how cleanly it is sampled,” the two settings become easy to tune.